How to install and use Google Lighthouse CLI
It is crucial to regularly perform page audits to detect unnoticed website issues related to performance and speed, as these are becoming increasingly important for better website performance and user experience improvement. Google Lighthouse is one of those auditing tools which is here to help developers. In this article, we are going to talk about one of the methods of using the Google Lighthouse tool, called CLI (Command Line Interface).
In this article:
- What is Google Lighthouse?
- What is Google Lighthouse CLI?
- How to install Lighthouse CLI
- How to use Lighthouse CLI?
- Lighthouse CLI auditing report path
- How to change Lighthouse CLI report saving path?
- How to customize Lighthouse CLI report format?
- How to change Lighthouse CLI auditing device?
- What are Lighthouse auditing categories?
- How to limit audit specific categories in Lighthouse CLI?
- How to limit and exclude audits in Lighthouse CLI?
- Using headless Google Chrome for Lighthouse CLI
- Bulk auditing in Lighthouse CLI
- FAQs about installing and using Google Lighthouse CLI
What is Google Lighthouse?
Google Lighthouse is a practical open-source auditing tool with which a specific page can be audited from Performance, Accessibility, Best practices, SEO, and PWA perspectives. Lighthouse performs different audits to check how the page responds, and if there are any failures during audits, they will be listed in the Lighthouse report.
What is Google Lighthouse CLI?
There are different ways to use the Lighthouse auditing tool including using Google Chrome DevTools, PageSpeed Insights, and Chrome Extension. Google Lighthouse CLI (CLI refers to Command Line Interface) is another easy and available method of using this auditing tool by commands.
How to install Lighthouse CLI
For installing Lighthouse CLI, first, you need to consider which operating system you are going to install Lighthouse CLI on. By following the rest of this article, you can learn how to install Lighthouse CLI on Windows, macOS, and Ubuntu. To start using Lighthouse CLI, you need Google Chrome and a package manager like npm (Node Package Manager).
npm installation
To install a package manager, you have to install the Node.js package on your OS. You can find node.js packages based on your operating system from the main Node.js website.

It is recommended to install the LTS version of Node.js
Windows: Download Windows Installer (.msi) and install it.
macOS: Download macOS Installer (.pkg) and install it.
Ubuntu: For installing node.js on Ubuntu OS, you can use the command below:
1. Download and import Nodesource GPG key.
sudo apt-get update
sudo apt-get install -y ca-certificates curl gnupg
sudo mkdir -p /etc/apt/keyrings
curl -fsSL https://deb.nodesource.com/gpgkey/nodesource-repo.gpg.key | sudo gpg --dearmor -o /etc/apt/keyrings/nodesource.gpg
2. Create deb repository.
NODE_MAJOR=21
echo "deb [signed-by=/etc/apt/keyrings/nodesource.gpg] https://deb.nodesource.com/node_$NODE_MAJOR.x nodistro main" | sudo tee /etc/apt/sources.list.d/nodesource.list
For using Lighthouse CLI, NODE_MAJOR value should be at least 18. In the latest versions of Node.js, NODE_MAJOR values are 20 and 21.
3. Perform node.js installation.
sudo apt-get update
sudo apt-get install nodejs -y
4. You can also check the node.js version using the command below:
node --versionLighthouse CLI installation
After installing npm, it is time to install Lighthouse CLI using npm. To do so, you can enter the command below in the Ubuntu or macOS Terminal or the Windows Command Prompt:
npm install -g lighthouseFor installing Lighthouse CLI, you need super user access to be run on Ubuntu OS.
When the g option is used for installing Lighthouse globally, you can run Lighthouse commands in your desired directories.
To make sure the Lighthouse installation is successfully done, you can run the command below:
lighthouse --version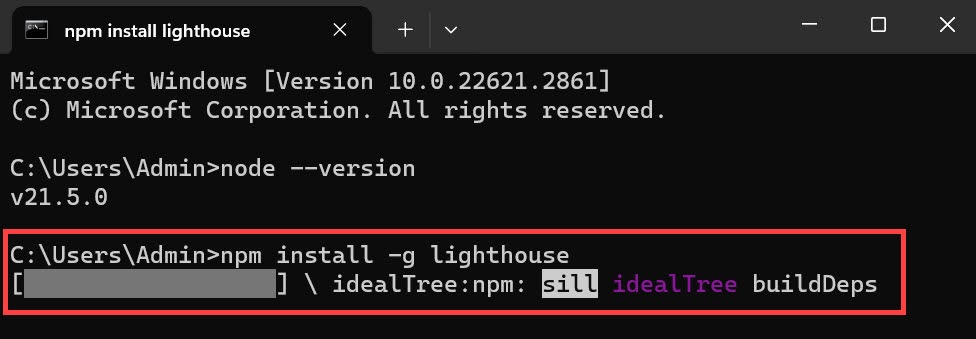
How to use Lighthouse CLI?
To star using Lighthouse CLI, it is better to see a list of its features using the command below:
lighthouse --helpThe main command format for using Lighthouse CLI is:
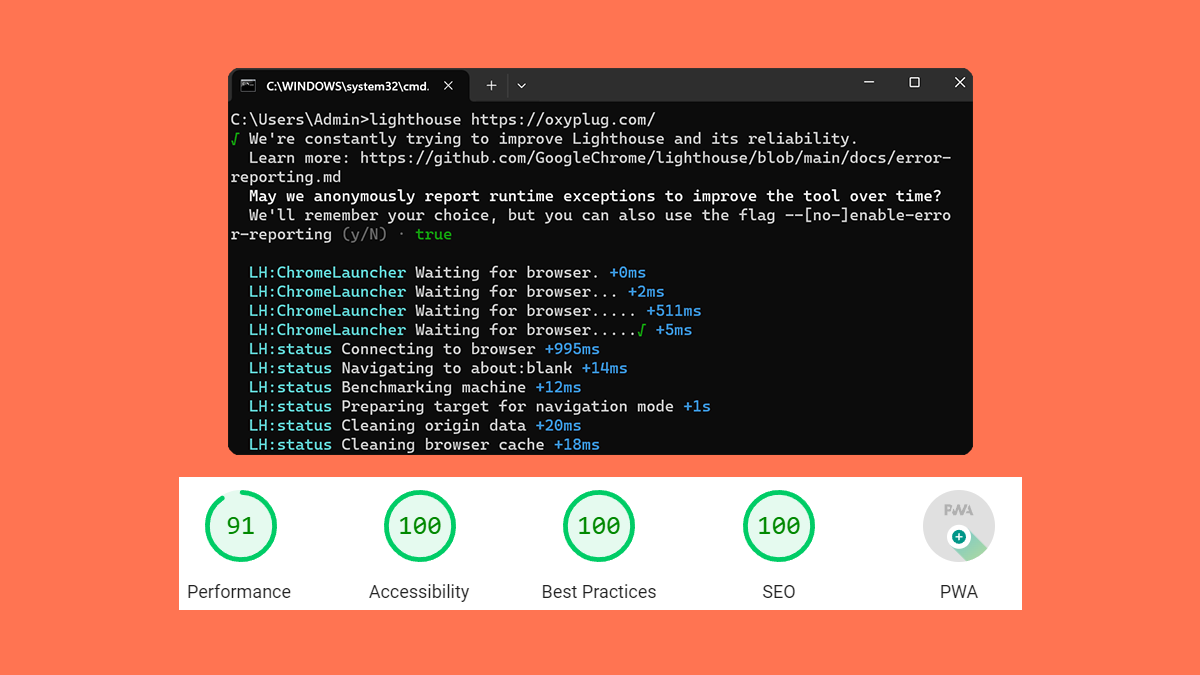
lighthouse <url> <options>Here is an example for auditing a page using Lighthouse CLI:
lighthouse https://www.oxyplug.com/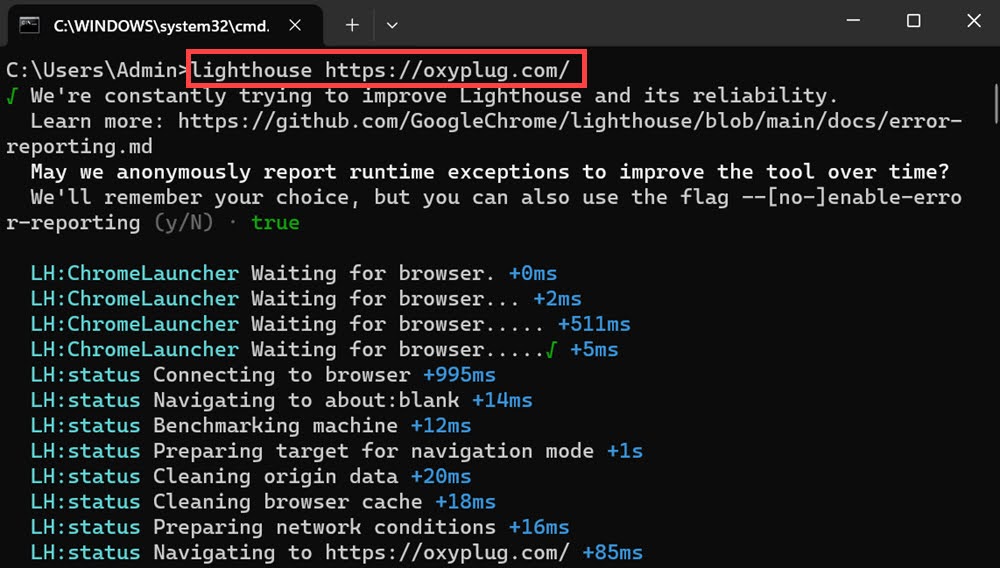
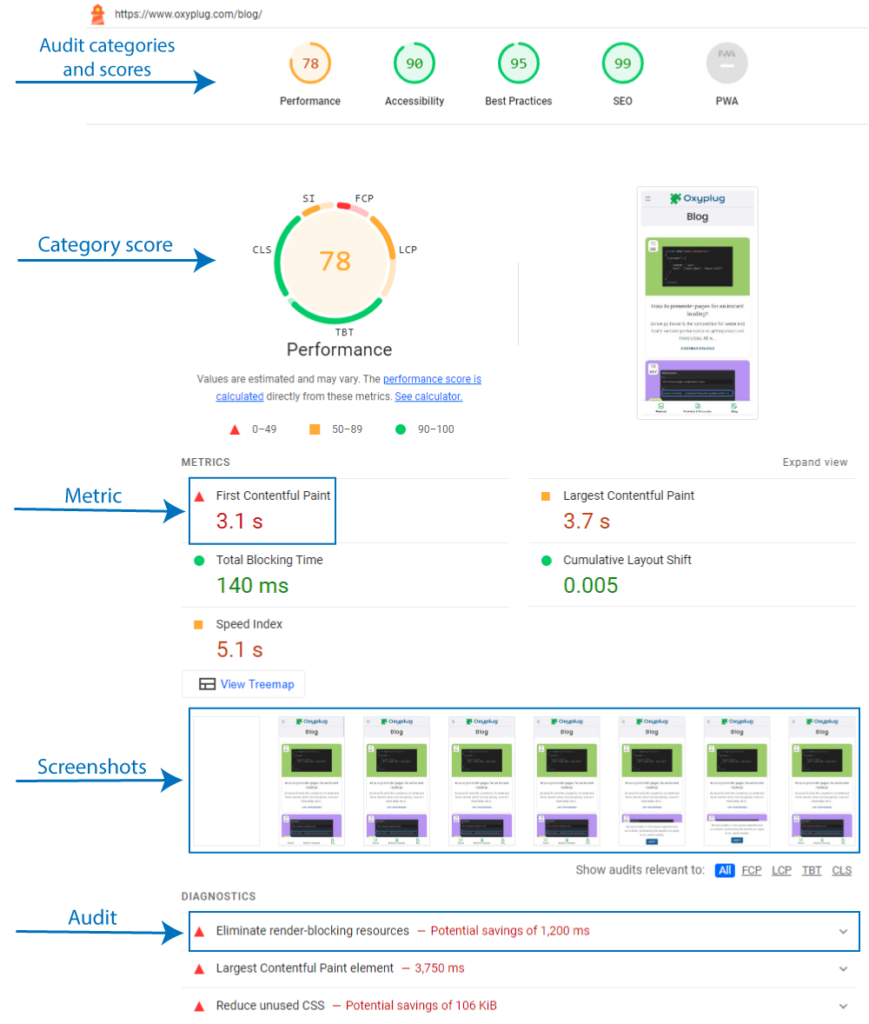
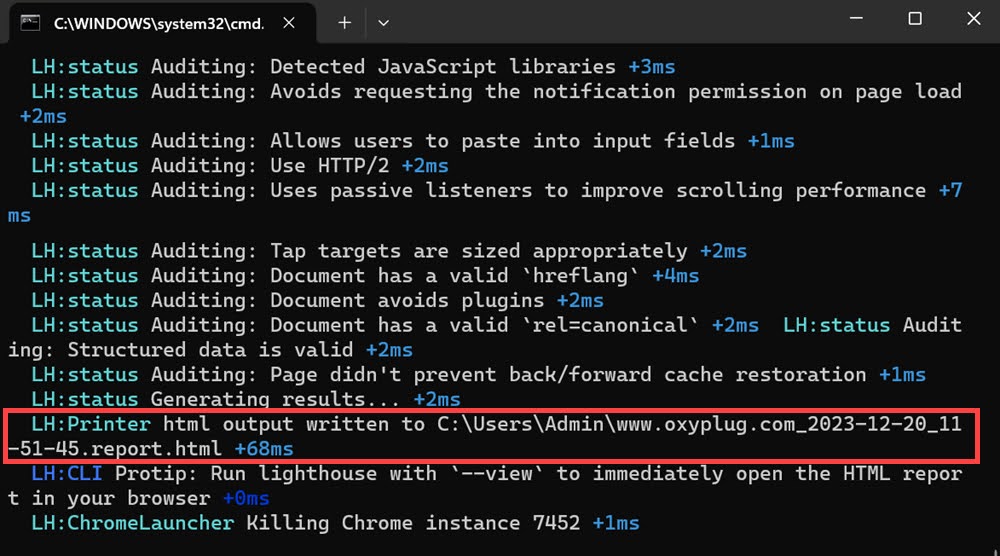
Lighthouse CLI auditing report path
By running the Lighthouse command, you will see a path for the audit report as in the image below, where you can access the Lighthouse report on your device.
You can also use the command below to see the report in the browser after the audit process is finished:
lighthouse <url> --viewHow to change Lighthouse CLI report saving path?
By using the command below, you can change the Lighthouse CLI report saving path:
lighthouse <url> --output-path
lighthouse https://www.oxyplug.com/ --output=html --output-path=/home/USER/Downloads/result.html
How to customize Lighthouse CLI report format?
By using the command below, you can save the Lighthouse report in up to three formats including HTML, CSV, and JSON:
lighthouse <url> --output
lighthouse https://oxyplug.com/ --output=json
lighthouse https://oxyplug.com/ --output=html --output=json --output=csv
How to change Lighthouse CLI auditing device?
Lighthouse audit is done with the mobile device preset by default, but you can use the commands below to change the device to desktop or to change the viewport dimension:
lighthouse <url> --preset
lighthouse https://oxyplug.com/ --preset=desktop
lighthouse https://oxyplug.com/ --preset=mobile
lighthouse https://oxyplug.com/ --chrome-flags="--window-size=800,600"
What are Lighthouse auditing categories?
Lighthouse auditing is divided into 5 categories:
- Performance
- Accessibility
- Best practices
- SEO
- Progressive Web App (PWA)
You can check the auditable items in each category using the command below:
lighthouse --list-all-auditsHow to limit audit specific categories in Lighthouse CLI?
If you want to run Lighthouse CLI for a specific goal and there is no need for other auditing categories’ reports, there is the possibility to limit or specify one or more specific Lighthouse auditing category(ies) by the command below:
lighthouse <url> --categories [array]
lighthouse https://oxyplug.com/ --only-categories accessibility
lighthouse https://oxyplug.com/ --only-categories best-practices,seo
How to limit and exclude audits in Lighthouse CLI?
In Lighthouse CLI, you can decide about each audit to be run by using the command below:
lighthouse <url> --only-audits [array]
lighthouse https://www.oxyplug.com/ --only-audits image-aspect-ratio
If you want to skip or exclude some of auditing items, following command is the solution:
lighthouse <url> --skip-audits [array]
lighthouse https://www.oxyplug.com/ --skip-audits canonical,font-display
Using headless Google Chrome for Lighthouse CLI
To use Lighthouse CLI, you need to have Google Chrome installed on your device. You can also use the headless Google Chrome browser which is run in the device’s memory without GUI. To do it, you can use the following command:
lighthouse <url> --chrome-flags="--headless"
lighthouse https://www.oxyplug.com/ --chrome-flags="--headless"
Bulk auditing in Lighthouse CLI
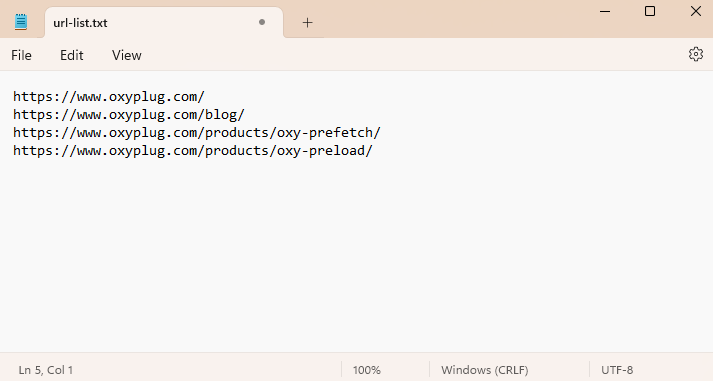
If you audit some URLs regularly, instead of auditing each URL separately each time, you can use the Batch feature to audit all URLs all at once each time.
To do so, you need to create a .txt file containing all desired URLs, each one in a new line (e.g. url-list.txt).
Then based on your device operating system, do the following:
Bulk auditing in Windows
Use a text editor like notepad++ and add the information below, then save it as a .bat format (e.g. lighthouse.bat). You need to replace the .txt file path with the path written below:
@Echo Off
FOR /F "delims=" %%a in (C:\Users\YOUR_CUSTOM_PATH\url-list.txt) DO (
	ECHO Line is: %%a
	lighthouse --quiet --chrome-flags="--headless" %%a
)
Now you can run Lighthouse batch audit by opening Windows Command Prompt, going to the .bat file path, and running the command below:
lighthouse.batlighthouse.bat is the example name here. You need to write the filename you have used for the .bat file on your device.
Bulk auditing in macOS and Ubuntu
If you use macOS or Ubuntu, you need to save the information below in a .sh file with a name like lighthouse.sh using a suitable text editor.
#!/bin/bash
while IFS='' read -r l || [ -n "$l" ]; do
	echo 'Working on report for the site… ' $l
	lighthouse --quiet --output=html --chrome-flags="--headless" $l
done < "url-list.txt"
Bash script break down:
IFS=”: Sets the Internal Field Separator to an empty string, ensuring that leading/trailing whitespaces in the input are preserved.
read -r l: Reads one line from the file (url-list.txt) into the variable l without allowing backslash escapes (-r prevents interpreting backslashes as escape characters).
|| [ -n “$l” ]: Ensures the loop runs for the last line of the file, even if it doesn’t end with a newline character ([ -n “$l” ] checks if the variable l is non-empty).
You should replace the .txt file path which you have created in the previous step in the code above.
Now, by using the chmod command, make the bash file executable.
chmod +x lighthouse.shNow open the Terminal on macOS or Ubuntu, go to the .sh file path and run the command below for starting Lighthouse CLI batch audit:
./lighthouse.shFAQs about installing and using Google Lighthouse CLI
On which operating systems can I install Lighthouse CLI?
Lighthouse CLI can be used on Windows, macOS, and Ubuntu.
What are Lighthouse report output formats?
Lighthouse reports can be generated in three formats: HTML, JSON, and CSV
Can I export the Lighthouse report in different formats at the same time?
Yes, it is possible to generate the Lighthouse CLI audit report in HTML, JSON, and CSV at once.
Can I use Lighthouse CLI using other non-Chromium-based browsers?
No, for using Lighthouse CLI, Google Chrome should be installed.
Thank you for this fantastic documention on how to install Google Lighthouse. The bash part is very helpfull.